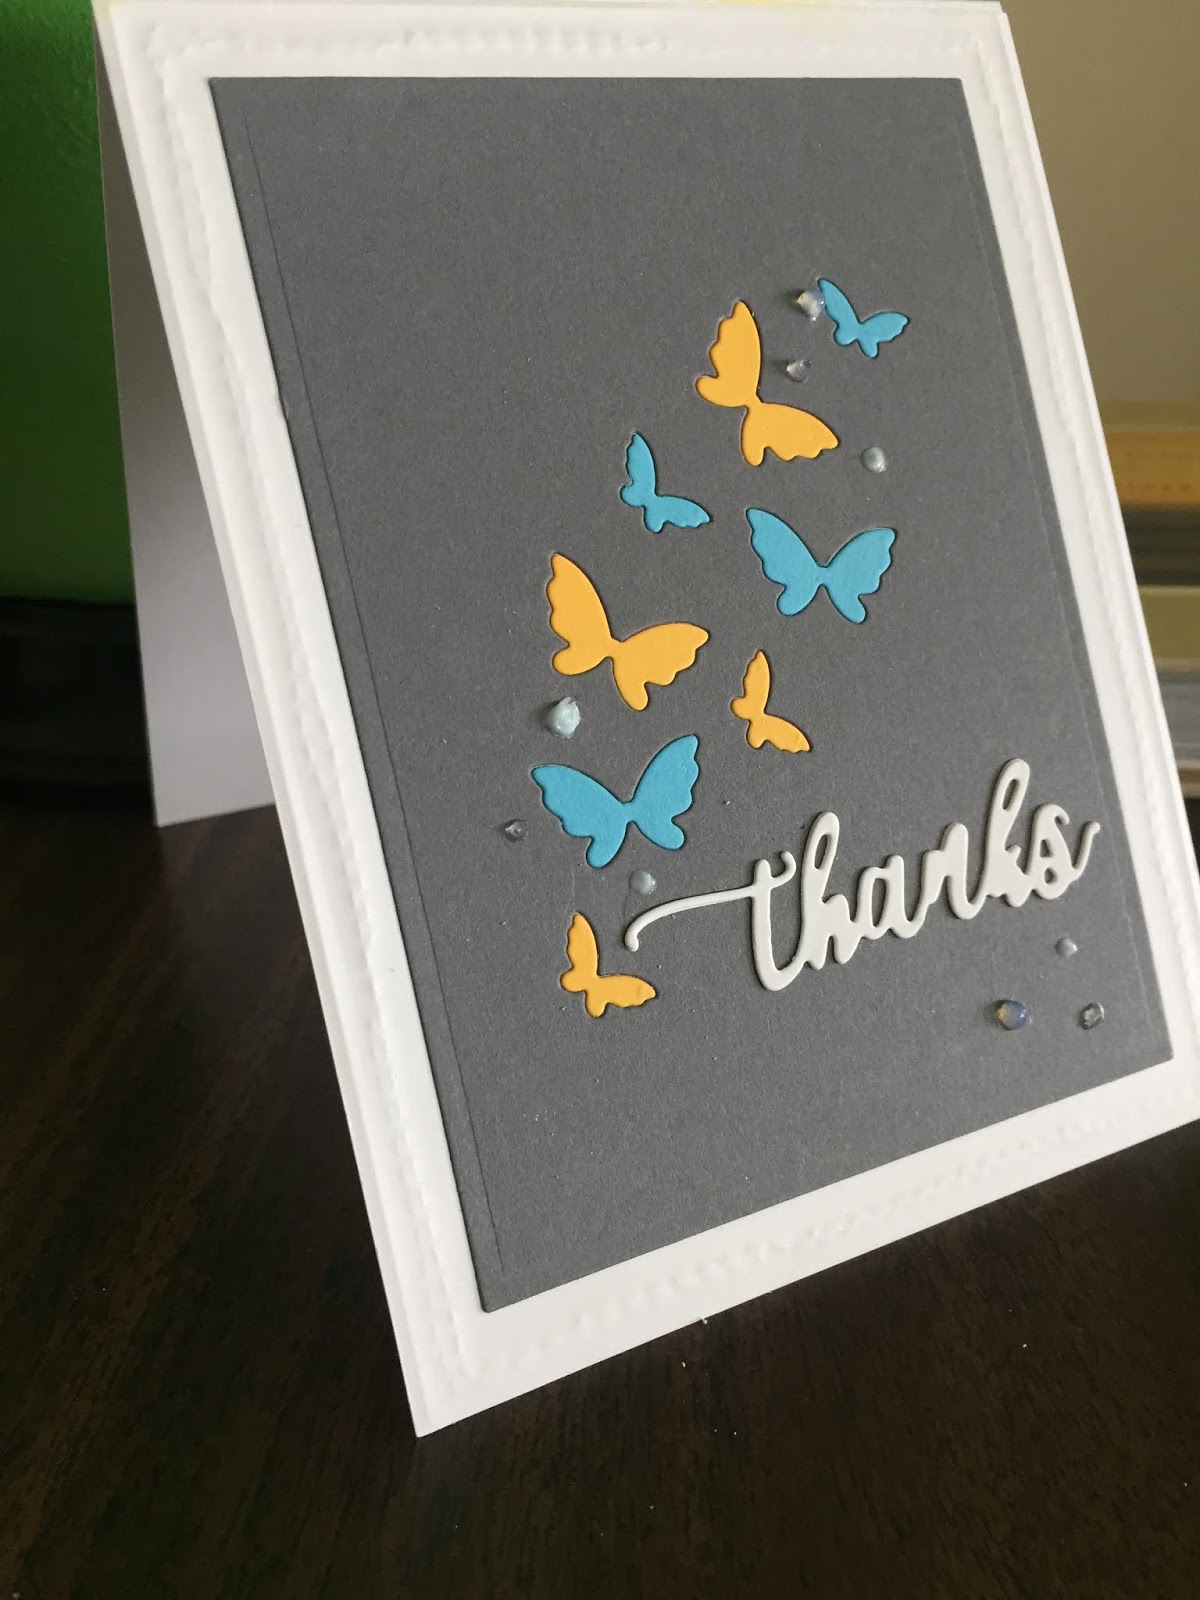
A few days ago I noticed I was very low on Thank-You cards, so I decided my next challenge entries would be Thank-Yous. This card is for the Less is More challenge, using the colors yellow, blue, and gray.
After seeing very cool cards by Cathy Zielske https://www.cathyzielske.com/images/2018/05/SpringHasCome2800.jpg, among others, for the Simon Says Stamp blog hop, I wanted to try my hand at the inlay technique. I've also seen it called letterpress. After die cutting an image, the cut-out pieces are glued back in place, either in the same color as the original die cut or in different colors.
One of the reasons I chose the butterflies is because just finished a book by one of my favorite authors, Barbara Kingsolver, featuring butterflies in the plot. The book, Flight Behavior, is centered around the fictional migration of monarch butterflies from their traditional wintering spot in Mexico to a spot in the Applachians. A great read, offering authentic information about monarchs and the environment. But, I digress.
I made three cards, each with a different background: gray, buff, and white, then mounted the die cut on white cardstock and glued the cut-out pieces to each using my Quickie Glue Pen . For the various colors I used blue, yellow, orange, and gray.
I just love how the inlaid pieces look once they're glued in!
For this version I made the sentiment a little differently, hand-lettering the Thanks and die cutting it using Cottage Cutz Double-Stitched rectangles. Then I adhered it using Darice thin foam strips.
On these last two cards, I added a layer to a single butterfly, folding it to pop up and gluing it down with a dot of Gina K's Connect Glue. And of course, a few little jewels for embellishment, Little Things Rainbow Sparkle Mix and Pretty Pink Posh Clear Droplets.
I die cut the card fronts for the gray and buff cards using my Spellbinders Card Creator. Then I embossed the white cardstock frame using Stamplorations Double Running Stitch die.
For the card above I simply cut the card front from white cardstock using my Avery Elle Double Stitch Rectangle die.
Inlay technique is fun and easy. Give it a try! Thanks for looking.
Supplies used (some compensated affiliate links):
<!-
The current AAA CAS card challenge, Inspired by Nature, really was a challenge for me because all of nature inspires me! Especially this time of year. You too? So for this challenge I looked to the particular part of nature capturing a lot of my time lately: my new Baltimore Oriole feeder. I spend a lot of my free time at the window, hoping for a glimpse of those fabulous orange and black birds and have been rewarded many times.
Since I don't have a bird stamp, I decided to start with just the colors, orange and black, as a basis for my card. Using a piece of Strathmore Vision Cover Stock watercolor paper, I smooshed Distress Oxide ink in Wild Honey and a little black . I threw couple slashes of black, using my Kuritake Fude calligraphy brush pen, I then sprayed everything lightly with water. My intent was to have a light background over which I would stamp either a flower or sentiment or both, and I anticipated the black slashes to bleed more than they did. However, when I looked at the result all I could see was a chubby little birdie with two legs! Not orange or sleek enough for an Oriole, but a birdie just the same. So my background became a bird.
I added a little Distress Oxide ink in Peacock Feathers for the sky area, then chose the sentiment from Simon Says Stamp's Beautiful Day set. I stamped it in Versafine onyx black then heat embossed with Hero Arts clear embossing powder.
I thought about adding a few sweeps of black to indicate wing feathers, but decided to just leave it as is. For a whimsical touch I added blue crystal jewels for eyes and an orange one to symbolize a beak. I trimmed the watercolor paper using Spellbinders A2 Card Creator die, which I really like because it cuts to just the right sizes for layering. I adhered the trimmed piece onto a Neenah Classic Crest card front, leaving a large enough margin for white space.
A little nutty, but hey, inspired by nature!
Supplies used (some compensating affiliates; I get a small commission when you click and purchase. Thanks!):


